WordPress hosting
 WooCommerce hosting
 PrestaShop hosting
 Magento hosting
 Joomla hosting
 Drupal hosting
With SupportHost, you can purchase an SSL certificate and install it by yourself.
Keep in mind that all plans come with a free SSL certificate issued by Let's Encrypt which is activated automatically.
In some cases, however, it is advisable to use a different type of SSL certificate. So let's see how to install SSL certificate.
Table of Contents
Purchase the SSL certificate
First, you need to purchase an SSL certificate, choose the most suitable one according to your needs.
There are three main types of SSL certificates: Domain Validation, Organization Validation, and Extended Validation.
Domain Validation
This type of SSL certificate certifies the registered domain but not the company. Depending on the type, they can be used for a single domain or multiple domains. This is the most common type of certificate that is used and can be suitable for personal and corporate websites.
Organization Validation
SSL certificates of this type rely on domain and company validation. In this case, to request them, it will be necessary to provide the necessary documentation relating to the company. Organization validation (OV) certificates are typically used for websites where transactions occur, for example, on e-commerce.
Extended Validation
Extended Validation (EV) SSL certificates are also known as Green bar certificates and are the most trusted type of certificate. In this case, the validation involves a more in-depth check-in in which it is verified not only that the company exists, but also that the request for the certificate has been initiated by a person belonging to the company itself. This type of certificate is used for websites with a high number of transactions, for example, large eCommerce or home banking websites.
If you don't know which certificate to choose, don't hesitate to open ticket support. One of our sys admin will guide you in the choice that best suits your project.
Once you complete the purchase of the SSL certificate, you will receive an email with a link for its activation. Before proceeding with the activation and installation of the SSL certificate, however, it is necessary to have a valid "CSR" (Certificate Signing Request).
Generate the CSR
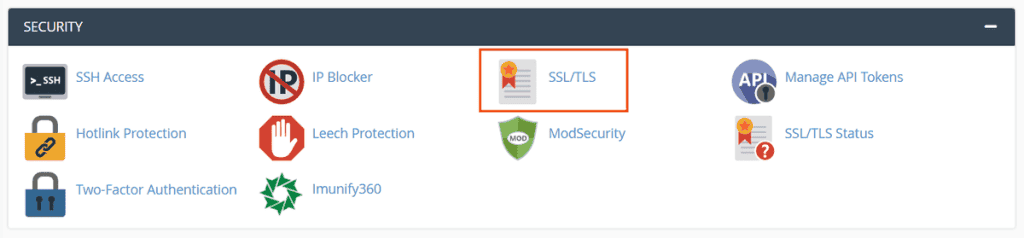
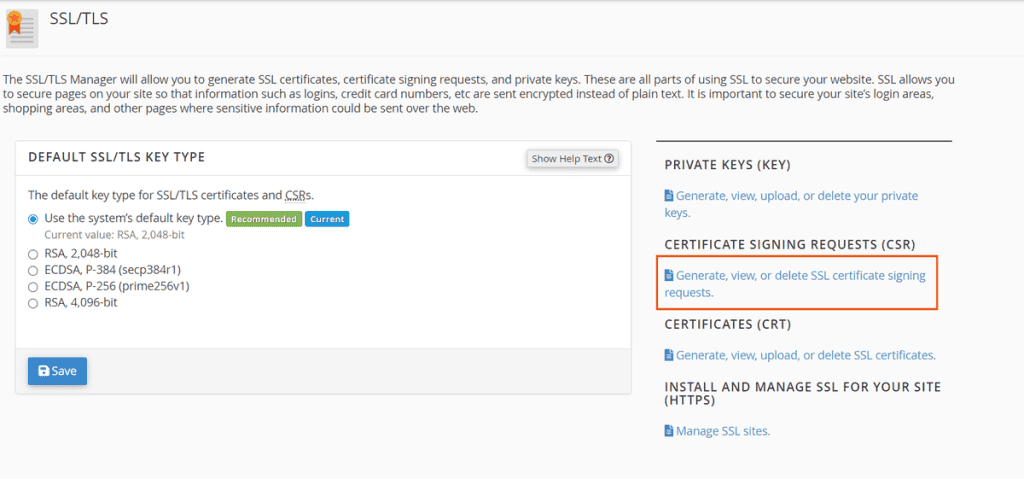
To create a new CSR, we need to login to cPanel and click on SSL / TLS in the "Security" section as shown on this screen.
Then, from the "Certificate Signing Requests (CSR)" section, click on Generate, view, or delete SSL certificate signing requests as indicated below.
To generate the CSR, it will first be necessary to fill in the following fields and provide all the requested information.
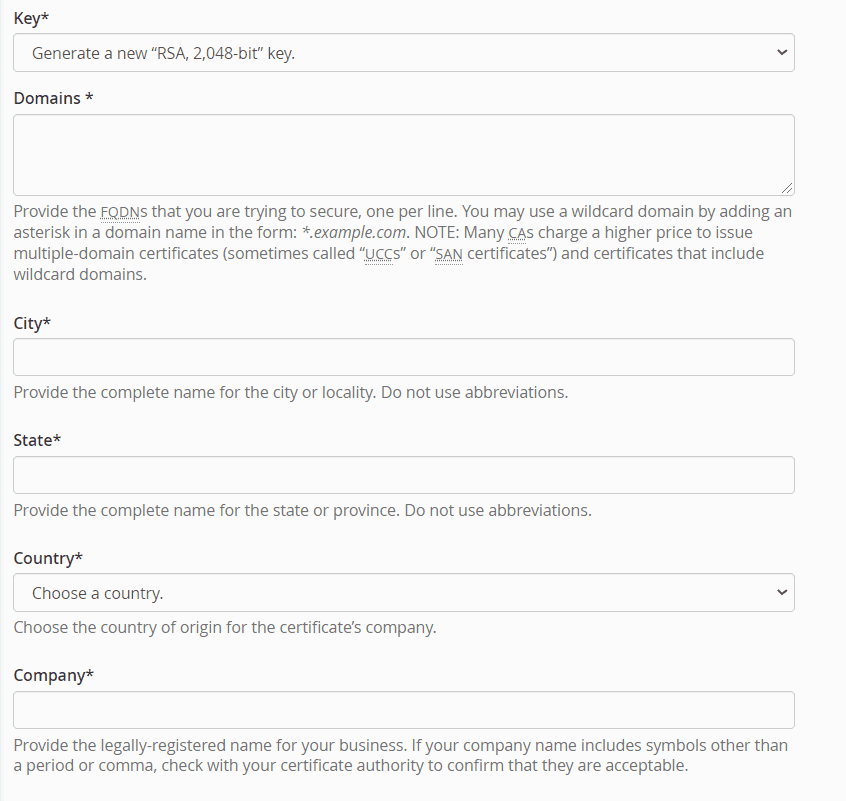
Key: you can choose a private key from the drop-down menu or generate a new key leaving the Generate option at the new "RSA, 2.048-bit" key.
Domains: in this field, you must enter the domain (or domains) for which you want to generate the CSR.
City, Province, and Country: you have to enter the city, province, and country where the company is based. The names of cities and provinces must not contain abbreviations, but must be written in full. The country must be chosen from the drop-down menu based on the two-letter ISO codes (eg IT for Italy).
Agency: you must enter the company name or the name of the certificate applicant for private individuals.
Then there are additional and optional fields that can be used to indicate: Company division, email, and description.
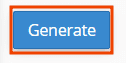
After filling in all the fields with the necessary data, click on the Generate button at the bottom of the page.
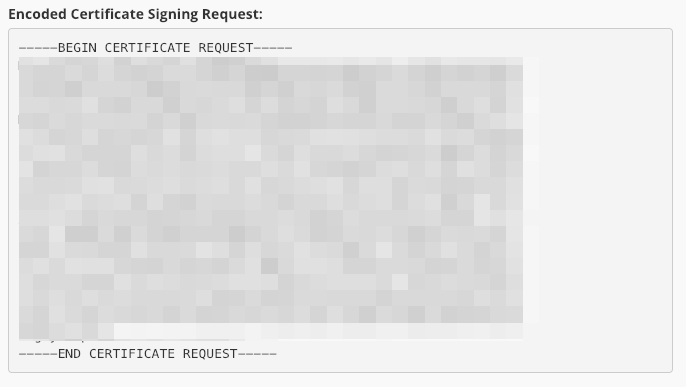
An (encrypted) CSR will then be generated, which you will need to copy as it will serve us to complete the next steps and install an SSL certificate.
Configure the SSL Certificate
At this point, we can click on the link received via email after ordering the certificate on SupportHost to configure it. You will be redirected to the client area, from which it is possible to manage the SSL certificate independently.
So let's fill in the various fields:
- Type of webserver -> cPanel
- CSR -> paste the code we just generated
The contact information comes from your profile, but you can change it if necessary.
At this point, we click on the button below to continue.
Complete the certificate validation
Since the certificate is "Domain Validated", we need to validate the domain. The easiest way is by creating an email address like the one listed in the options.
So let's create the email address [email protected], select the address to send the confirmation email to the correct address, and continue.
At this point, we will see a message informing us that we have completed the configuration. We just have to wait to receive the confirmation email.
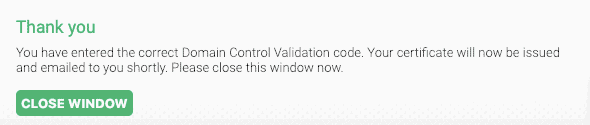
The first email we will receive will contain a link for domain validation and a verification code. We follow the link, enter the code, and receive a confirmation message telling us that we have successfully verified the domain and will receive the certificate via email shortly.
At this point, it may be necessary to wait a few minutes before receiving the certificate, which must be generated by the certifying entity.
Once generated, the certificate will be sent via email, or it will be possible to download it from the client area.
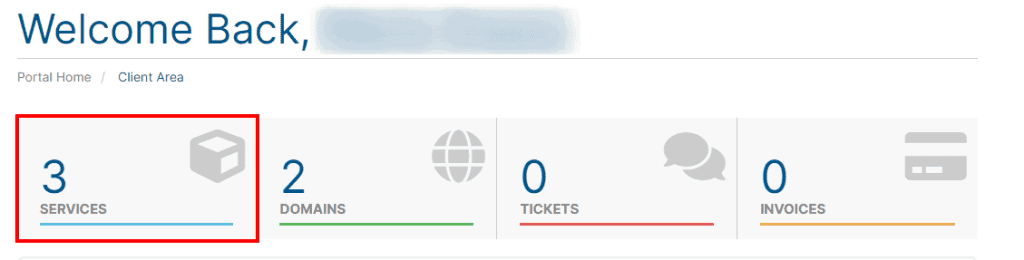
Download the certificate from the client area
To download the certificate directly from the client area on SupportHost, you need to log in and click on Services.
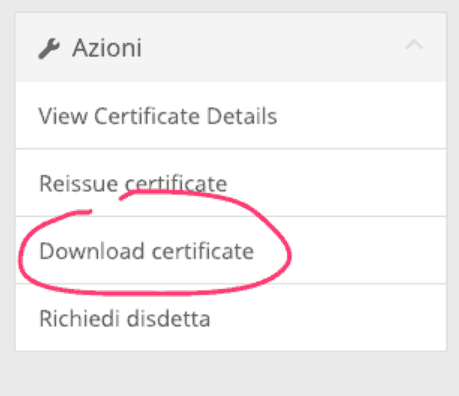
Here we will see a list of services. We must click on the certificate name to view the details, then click on "Download Certificate" in the sidebar on the right.
The certificate is nothing more than a zip file that contains two files. The archive just downloaded contains a .crt file and a .ca-bundle file.
The file that we will have to upload to cPanel to install the SSL certificate is the .crt file.
Both files can be opened via a text editor, but we won't need to open them to install the SSL certificate.
Install SSL certificate
At this point we generated our certificate, we checked it and the certifying entity sent us the SSL Certificate. The last step is to install SSL certificate.
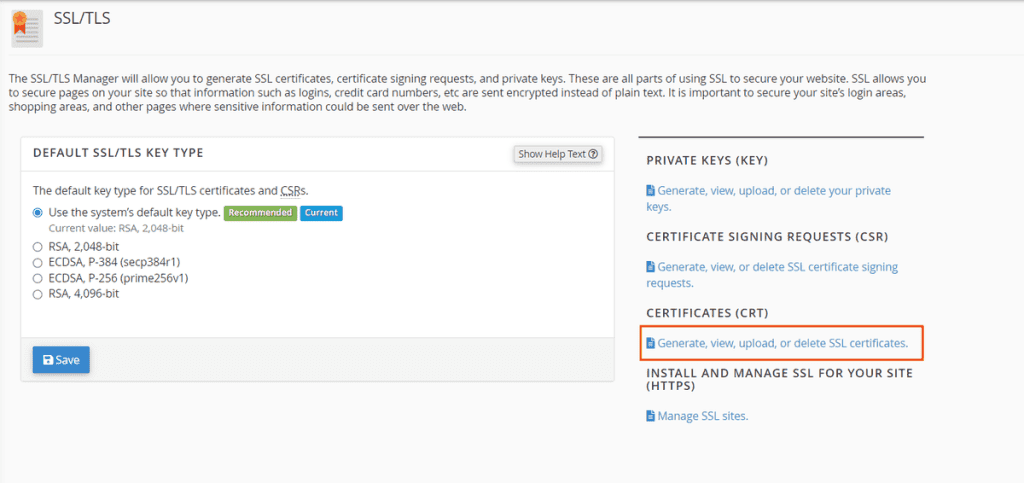
We must then log in to cPanel and click on SSL / TLS in the "Security" section.
From the Certificates (CRT) section, click on Generate, view, upload, or delete SSL certificates.
Then scroll to the section "Upload a new certificate".
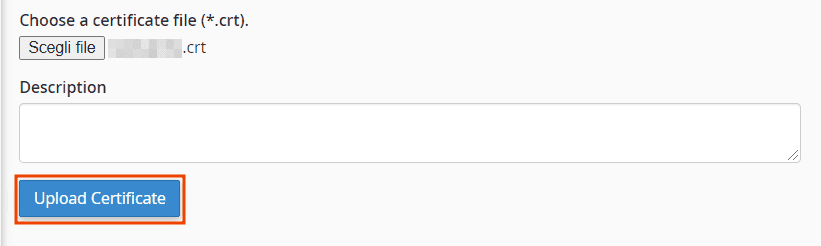
In the "description" section, we can insert some notes while clicking on Choose file, we can upload the certificate, which is the .crt file that we downloaded earlier.
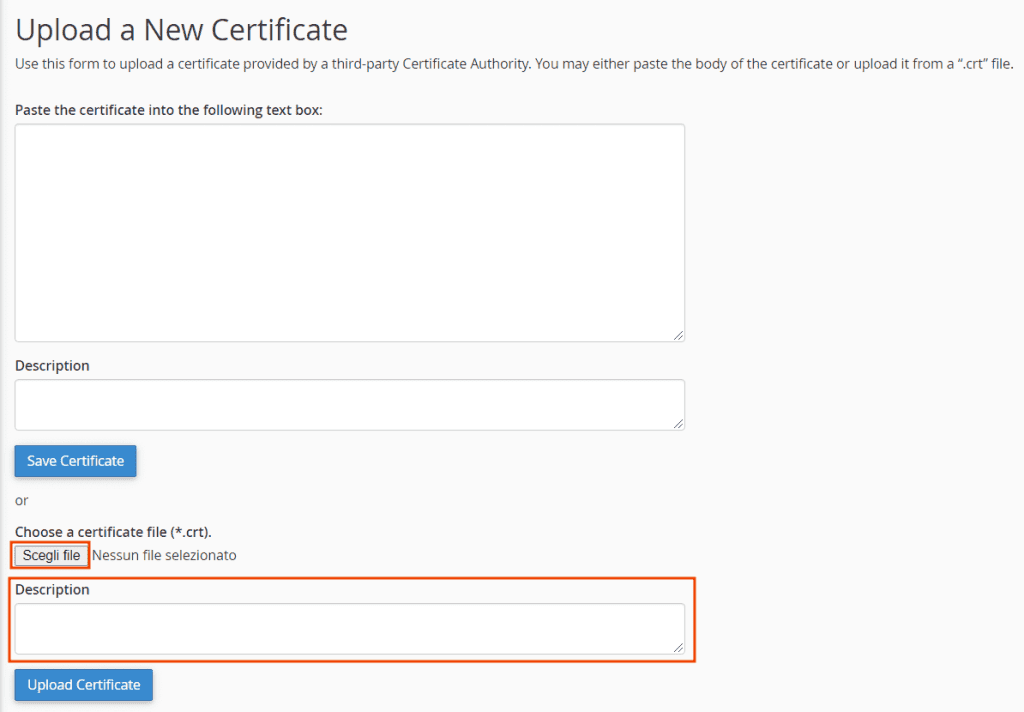
After selecting the file to upload, click on the Upload certificate to complete the operation.
At this point, you should receive a confirmation message that the installation of the SSL certificate was successful and the certificate is active.
Reissue the certificate
If you have made a mistake, or you want to move your certificate to use it on another website, you can perform the “Reissue” by clicking on the relevant link in the sidebar in the product sheet. The steps to follow are the same as we have seen in this guide.
Please note that the certificate will stop being valid after you reissue it.

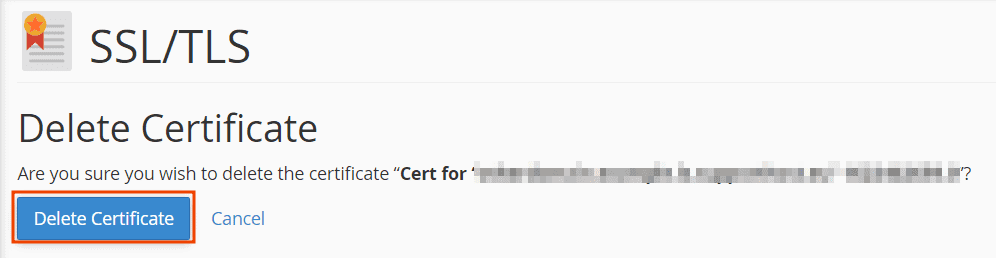
Delete SSL certificate
To delete an SSL certificate from cPanel, you need to access the SSL certificate management. Log in to cPanel and click on SSL / TLS from the Security section.
Click Generate, View, Upload, or Delete SSL Certificates.
In this section, you will see the list of certificates installed on your account, the domains on which they are installed, the issuer, the expiration, and a short description of the certificate.
Next to each SSL certificate in the Actions column, you will see a Delete button. Click on it to proceed with the removal of the certificate.
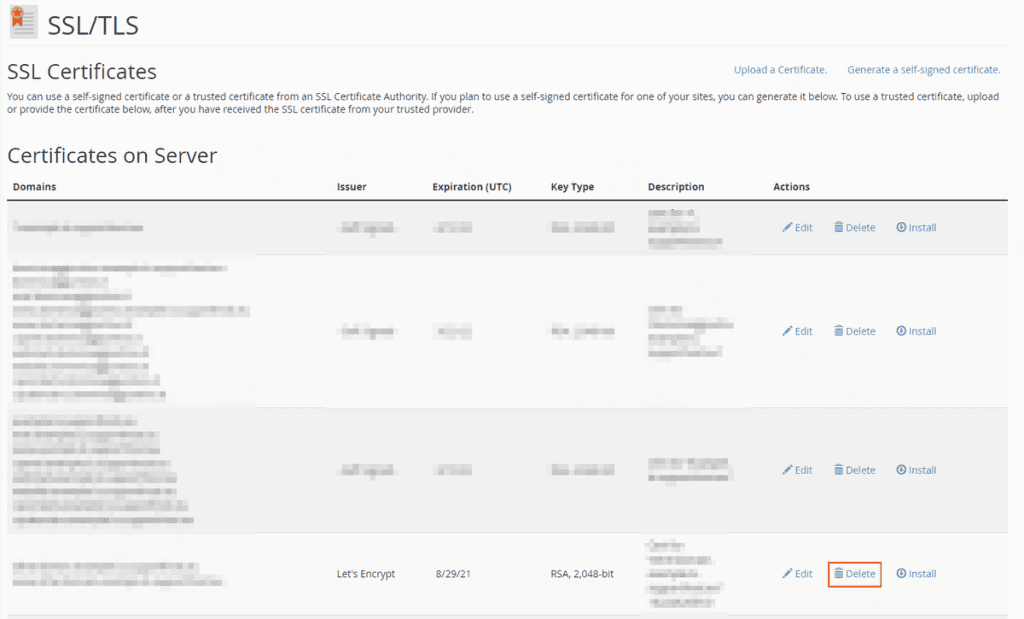
You will then be prompted for confirmation. To proceed, click on Delete certificate.